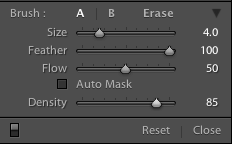
 I wanted to begin this post with a word about the “flow” and “density” sliders inside the Adjustment Brush panel. These are very important for controlling how your adjustments are applied, but they are fairly simple to figure out. Think of the density slider as the maximum that the effect can be applied. For example, if you were coloring with a black brush but you only had the density slider at 50, the color would not get darker than a mid-tone grey.
The flow slider basically controls how quickly the brush can get to it’s maximum density. Using the previous example, if you had the flow slider set to 25 on your black brush and your density at 100, you could paint solid black, but you would have to paint over the same spot four times. The flow slider is not actually a percentage scale, but you get the idea. You can use these controls to make subtle changes to your pictures that really add up. Now on to the tip…

Original
Here is a crop of the same image I used in the previous tip. She is obviously an attractive young woman, but we can do a couple of quick things to give this portrait a more finished look. The coolest thing to me is that we’re going to to this within Lightroom. No Photoshop, no layers, and completely non-destructively!
The first thing I’m going to do is press “D” to enter the develop module, and “K” to activate the Adjustment Brush. I select “clarity” from the drop-down menu and lower the clarity slider to around -50. I set feather and density to 100, flow to 50 and turn off auto mask. I paint over the woman’s skin, avoiding areas of detail such as the eyes and mouth. Press “O” to see the mask’s overlay and erase anywhere that the effect may overlap important details. Adjust the clarity slider until the skin looks smoother and softer, while still retaining a natural look.

Skin Softened
The next thing we’ll do is brighten the eyes. (Quick tip- for a new brush press the “K” key twice. This is quicker and easier than scrolling up to the “new” button in the adjustment brush panel.) For my new brush I set the brightness to around +50, saturation and clarity to +20 and sharpness to +50. I use a low flow (round 20) and build up the effect slowly. You don’t want to overdo the eyes, so use the toggle switch at the bottom left of the adjustment brush panel to turn the effect off and on and see your progress. Remember, you can adjust the properties of the brush AFTER you paint. If you decide on more brightness or sharpening you can grab the sliders and get to it!
The last thing I want to do is touch up her make-up. Press “K” twice for a new brush and select color from the drop down menu. Click in the color sample box. Here’s a cool trick… click and hold inside the color picker, drag the dropper to an area of color in the lips, then release the mouse. Now you can paint over the lips to intensify the color that’s already there. Use a low flow and build up the color so it looks natural, but a bit more intense.

Eyes bright and a bit of lip gloss
There you go… quick and easy, right there within Lightroom. Don’t forget to save your favorite settings as a brush preset using the drop-down menu in the adjustment brush panel. I have a “skin-softening” preset, “eyes-bright” preset and a few others that I use regularly. Next time we’ll explore more uses for the color brush.
Part One of this series HERE


wonderful tips! Thank you!